Import user (Admin)
This feature is only available for netfiles Data Room Professional and Premium and netfiles Data Vault.
Administrators can import new user accounts into the netfiles data room using a template Excel list.
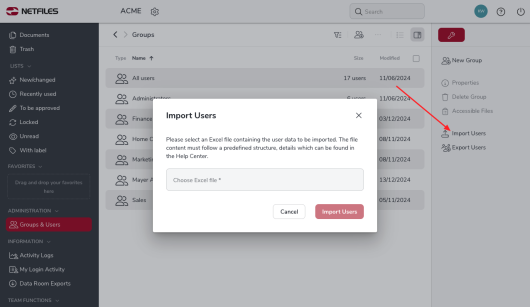
In the “Administration” area, click on “Groups & users” in the left-hand toolbar and then on the “Import users” feature in the right-hand toolbar.
Format the Excel file
Please note that the Excel file must have a certain format:
- The columns and fields must be listed exactly in the order shown in the screenshot. Most of the fields and columns are intuitive.
- We recommend leaving the “User name” field empty, as this is automatically generated by netfiles. If you have special requirements regarding the user name, please contact netfiles support.
- The following fields are mandatory and must be completed: Last name, first name, e-mail, language and visibility. If 2-factor authentication is activated in the data room, the mobile number must also be entered.
- The entries in the “Visibility of other users” field or column correspond to the following settings:
- none – No other users except administrators
- group – All users who are at least in a group with him/her
- all – All other users (including those in other groups)
- The fields in the Phone and Mobile column should be formatted as text in Excel so that the format +49 123 123123123 can be used for the numbers.
You can download a sample file here.
Invite users
When the import has been completed, the list of imported user accounts is available as follows:
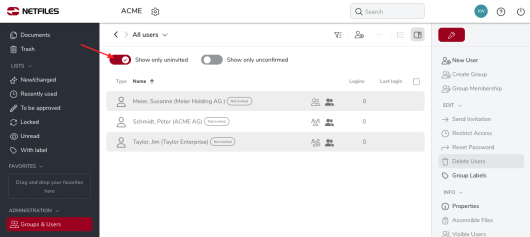
In the “Groups & Users” area, go to “All users” and activate the “Show only uninvited” feature. Here you will see all created or imported users who have not yet received an invitation to the data room. The invitation to the data room is still open for imported user accounts. You can check the import again here.
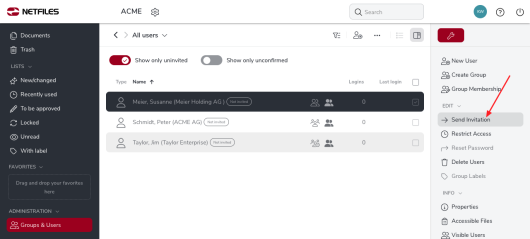
Click on “Send invitation” in the right toolbar to send the invitation to the imported user.
-
General
- Introduction to netfiles
- Creating a passkey for netfiles
- Logging into netfiles with a passkey
- Navigation in the data room
- List view, explorer view, icon view
- Login verification 2-factor authentication (Admin)
- Context menu
- Supported web browsers
- Authenticator App for login verification OTP (one-time password)
-
Administration
-
- Interfaces API access
- SFTP Passwordless authentication (Admin)
- SFTP – netfiles integration in Windows (Admin)
- SFTP Technical documentation (Admin)
- WebDAV/SFTP - Client programs (Admin)
- WebDAV - netfiles integration in Windows
- WebDAV Interface (Upgrade new interface)
- Microsoft Office - Editing on WebDAV network drive blocked
-
Data Room Settings
- Appearance settings - logo & colors (Admin)
- Navigation / Features Settings (Admin)
- Documents Settings (Admin)
- Comments Settings (Admin)
- Preview & Watermark settings (Admin)
- User & Groups settings (Admin)
- Emails & Notifications settings (Admin)
- Password settings (Admin)
- Login settings (Admin)
- Activity Logs settings (Admin)
- Indexing settings (Admin)
- Disclaimer settings (Admin)
- Sample disclaimer for the netfiles data room
-
Users and Groups
-
Documents
-
- Send link internally
- External Data Transfer / Secure File Transfer – send
- Sent folder External file transfer
- Activity log External Data Transfer (secure file transfer)
- Sending download links with own e-mail program / external date transfer
- Receive file - External file transfer (secure file transfer)
- Automatic notifications of changes
- Automatic notification of changes (Admin)
- Upload
- Upload ZIP archives
- Download
- Folders
- Comments settings (Admin)
- Comments on folders and files
- Rename folder description and folder
- New document
- Document preview
- Document preview - supported file formats
- CAD Viewer / document preview
- Redact PDF files
- Create private annotations (comments) to files
- Create shared annotations (comments) to files
- Mark unread documents
- Document description
- Copying and moving folders or files
- Create link
- Delete / Trash
- Delete files / Trash (Admin)
- Filter function
- Favorites
- Lists - new, modified, unread, expired and to be approved documents
- Personal labels
- Group labels
- Encrypt PDF files for download (Admin)
- Versioning of documents
- Document approval / release workflow (Admin)
- Open XLSX files in navigable preview
- Setup editing Office documents online with OnlyOffice (Admin)
- Editing Office documents online in netfiles with OnlyOffice
- Editing Office documents together online with Only Office
- Setup editing Office documents directly from netfiles with Microsoft Office (Admin)
- Editing files in netfiles directly with Microsoft Office
- Weitere Artikel (21) Artikel reduzieren
-
-
FAQ
- How can I change the data room name / project name? (Admin)
- Tips and information on security settings in netfiles
- How can I check which documents users/user groups have access to? (Admin)
- How can I control which other users can see a user in the data room? (Admin)
- How can I restrict user access or data room access in terms of time? (Admin)
- Who can see the recycle bin and with what content?
- Why does the document preview not display a document?
- How do I ensure that users do not see each other? (Admin)
- How can I restrict user access or data room access in terms of time? (Admin)
- How can I restrict a user's access to two or more subfolders? (Admin)
- Why is there a red box in front of my file name?
- How do I change my e-mail address?
-
netfiles Data Vault
-
netfiles Enterprise Data Room Premium
-
netfiels Send


